This post is contributed by Simon Bracegirdle, a Senior Consultant with Mechanical Rock.
Introduction
At Mechanical Rock, we are strong believers in the benefits of continuous integration (CI) and continuous deployment (CD) pipelines. CI in particular is useful for running all kinds of validation and checks on your code before and after merging. For example, you can run; unit tests, static type checkers, linters and code builds. For robotics teams, one useful validation step is simulation.
This allows fast and extensive testing of robot software before pushing it out to your live robots. This reduces the risk and shortens the feedback loop of each deployment you make.
Of all the CI/CD tools available today, GitHub Actions is emerging as a popular and easy to use option for building your pipeline. But, up to this point, there hasn’t been a lot of discussion of how to use it in a robotics context.
In this tutorial we’ll run a robotics simulation using ROS and Gazebo in a Github Actions pipeline, using the Turtlebot simulation packages. We’ll start by creating a simplistic robotic movement script and a ROS test script. Then we’ll configure the GitHub Actions pipeline and then run it.
The benefits of GitHub Actions
One of the key benefits of GitHub Actions over alternatives is that it’s directly integrated into the GitHub product, which is one of the worlds most popular source code repositories. This means you get build feedback directly in your pull requests, and in your email. For example; if you make a change that causes unit tests to fail, it will prevent you from merging that code in the pull request, and you’ll get an email about it.
Another benefit of GitHub Actions is that by default it’s fully hosted, meaning you don’t need to worry about running servers for your build jobs. GitHub will run your build jobs on their servers for you. On free plans you get a limited number of build minutes for free. On paid or enterprise plans you get more.
In this tutorial we’ll introduce the basics of GitHub Actions and how to run ROS simulations in it with Gazebo.
What you will need
To setup a simulation in GitHub Actions, you will need:
- A GitHub account, with free GitHub action minutes available. You can sign-up here.
- A GitHub repository setup for your project. Instructions for first-timers here.
This tutorial will assume some ROS and Python experience. It’s expected that you’ve used them before and know some of the basic concepts.
ROS installation and workspace creation
Let’s create a directory to house the project and ROS workspace:
mkdir ros-github-actions-tutorial
cd ros-github-actions-tutorial
To follow this tutorial you will need access to a ROS environment. There’s two ways that you can do that:
Option 1) You’re running a ROS supported system and are happy to install ROS
If you’re running Ubuntu or Debian you can install ROS Melodic by following the installation instructions on the ROS website.
Option 2) You can run ROS in Docker
If you don’t have a supported system, or you would prefer not to install ROS on your base OS, you can containerize ROS instead.
After you have Docker Desktop installed, follow the steps below to run the ROS melodic container:
docker run -it --name ros-github-actions \
  public.ecr.aws/docker/library/ros:melodic-robot /bin/bash
If all goes well, you should get a bash shell inside the container:
root@de531b44067b:/#
Installing Gazebo and Turtlebot
Having acquired ROS, the next step is to install the Gazebo and Turtlebot packages:
sudo apt-get update && sudo apt-get install -y ros-melodic-turtlebot3 ros-melodic-turtlebot3-simulations ros-melodic-gazebo-ros-pkgs ros-melodic-gazebo-ros-control
Setting up the ROS project
Now that we have ROS and our dependencies setup, the next step is to create our ROS project and run it locally. This will allow us to iterate on any changes before pushing it to GitHub.
Create workspace and package
Let’s create a new ROS workspace and package:
mkdir -p catkin_ws/src
source /opt/ros/melodic/setup.bash
catkin_create_pkg my_turtlebot_sim
Write our robot script
It’s time to create the navigation code for our robot! Since this is for demonstration purposes, we’ll be naive and command our robot to drive in a straight line.
To start, create the file catkin_ws/src/my_turtlebot_sim/mover.py. Then, paste in the following code, which sends a linear velocity command on each 10Hz tick to the robot:
#!/usr/bin/env python

import rospy
from geometry_msgs.msg import Twist

def move():
    """Continuously move the robot by sending velocity commands
    """
    rospy.init_node('robot_mover', log_level=rospy.DEBUG)

    # We want to publish the velocity message to the /cmd_vel topic
    velocity_publisher = rospy.Publisher('/cmd_vel', Twist, queue_size=1)

    # Create the velocity message
    vel_msg = Twist()
    vel_msg.linear.x = 1.0

    # Send the message at 10Hz (10 times a second)
    r = rospy.Rate(10)

    while not rospy.is_shutdown():
        # Publish the velocity message each tick
        # so that our robot is continuously moving
        velocity_publisher.publish(vel_msg)
        r.sleep()


if __name__ == '__main__':
    try:
        move()
    except rospy.ROSInterruptException:
        pass
Why test in simulation?
If we’re working with a serious robotic code base, it’s valuable to have tests check the correctness of code before or after merging. This can drastically reduce the time to find issues and prevent leakage into live systems.
This is important when supporting maintenance and improvements over the life of the product. Having a strong test suite gives you the confidence to make changes, even large re-factorings, without negative side effects.
Unit testing is one approach than can help, but since it verifies functions and components in isolation, it wouldn’t verify the effect of the code and robotic system working together.
That’s where simulation comes in. It enables in-software integration testing of robotics systems.
Stubbing out the test
Let’s show how that process works by writing a test that will run in our simulation environment.
The boilerplate for a rostest looks like this:
#!/usr/bin/env python

import unittest

class TestBotMoves(unittest.TestCase):
    def test_movement(self):
        # Test code goes here

if __name__ == '__main__':
    import rostest
    rostest.rosrun('my_turtlebot_sim', 'test_bot_moves', TestBotMoves)
To start, paste that boilerplate to a new file at catkin_ws/src/my_turtlebot_sim/test_bot_moves.py.
Once we add a launch configuration in a later step, the test_movement test will run when we start rostest with this script.
Writing the test logic
We want to check that the robot has moved a fixed distance from the spawn point. We’ll set a timeout so the test doesn’t run forever in case of an issue.
To check if the robot’s moving, we’ll write three methods in the TestBotMoves class. For the first method, let’s save the position of the robot when it moves, using the model position data from Gazebo:
def movement_callback(self, data):
    """Record the robot's simulation world position whenever it's
    updated, so that we can check how far it has travelled from
    the spawn point.
    """

    # Find the index of the turtlebot model within all Gazebo models.
    if self.idx is None:
        self.idx = 0
        for name in data.name:
            if name == 'turtlebot3_burger':
                break
            self.idx += 1

    # Save current X/Y position in the sim world
    self.x = data.pose[self.idx].position.x
    self.y = data.pose[self.idx].position.y
For the second method, let’s run some pythogaras to get the distance from the spawn point to the robot’s current position:
def get_distance_from_spawn(self):
    """Use pythagoras to get total distance away from the spawn point
    """
    return math.sqrt(abs(self.x) ** 2 + abs(self.y) ** 2)
The third method will be the test method itself, which starts the node, subscribes to the Gazebo model state topic, and then continuously checks if the robot has travelled the expected distance:
def test_movement(self):
    """Test that the robot is continuously movement by tracking how
    far it has travelled from it's original spawn point (0,0,0)
    """
    rospy.init_node('test_movement', log_level=rospy.DEBUG)

    self.idx = None
    self.x = 0.0
    self.y = 0.0

    # We're expecting the robot to move 1.5 meters from spawn
    expected_travel = 1.5

    # Subscribe to Gazebo model states, which contains the robot's position.
    self.subscriber = rospy.Subscriber(
        '/gazebo/model_states', ModelStates, self.movement_callback)

    # Keep iterating until the robot travels as far as we expect
    travelled = self.get_distance_from_spawn()
    while travelled < expected_travel and not rospy.is_shutdown():
        rospy.loginfo('Travelled; %s m', round(travelled, 1))
        rospy.sleep(1)
        travelled = self.get_distance_from_spawn()

    # The robot has travelled as far as we expect. Test complete!
    assert travelled >= expected_travel
Add the test launch file
To run tests in ROS, we need to create a .test file, which is a superset of a .launch file. This file describes the nodes and tests that we want to run.
Create this file at catkin_ws/src/my_turtlebot_sim/my_turtlebot_sim.test:
<launch>
  <!-- Specify the variant of turtlebot we want -->
  <arg name="model" default="burger"/>

  <!-- Launch our robot moving script -->
  <node pkg="my_turtlebot_sim" name="mover" type="mover.py" required="true" output="screen"/>

  <!-- Launch the turtlebot simulation in Gazebo -->
  <include file="$(find turtlebot3_gazebo)/launch/turtlebot3_empty_world.launch">
    <arg name="model" value="$(arg model)"/>
  </include>

  <!-- Run our test script that asserts the robot does what we expect -->
  <test test-name="test_bot_moves" pkg="my_turtlebot_sim" type="test_bot_moves.py" time-limit="30.0"/>
</launch>
You will also need to add these lines to the bottom of your catkin_ws/src/my_turtlebot_sim/CMakeLists.txt file:
catkin_install_python(PROGRAMS mover.py
  DESTINATION ${CATKIN_PACKAGE_BIN_DESTINATION}
)

if(CATKIN_ENABLE_TESTING)
  find_package(rostest REQUIRED)
  add_rostest(my_turtlebot_sim.test)
endif()
You can see my full CMakeLists.txt file here.
Run the test locally
We’re now ready to test our sim locally! To launch it, run the following command:
TURTLEBOT3_MODEL=burger rostest my_turtlebot_sim my_turtlebot_sim.test --text
This will launch the mover.py node, the Turtlebot sim and our test script.
If everything went well, the test will pass and you should see the output below:
[INFO] [1653027100.845619, 1.026000]: Travelled; 0.2 m
[INFO] [1653027101.863594, 2.030000]: Travelled; 0.8 m
ok

----------------------------------------------------------------------
Ran 1 test in 3.793s

OK
-------------------------------------------------------------
SUMMARY:
 * RESULT: SUCCESS
 * TESTS: 1
 * ERRORS: 0 []
 * FAILURES: 0 []
Nice work! We’ve completed our robot and simulation. Let’s move onto to defining our GitHub Actions pipeline.
If you have any issues with your project, please compare your project to the reference project in GitHub.
Setting up GitHub Actions
We can use GitHub Actions by defining workflows in yaml files. A workflow is a process that triggers under certain conditions, which we define in the on block. When we trigger these conditions, for example by pushing code to a branch, or opening a pull requests, then it executes commands that we define in the jobs block.
The jobs block defines the stages of our workflow. Each job can be dependent on other jobs. For example, you may want to run a deploy job after running your build and test jobs.
In our case, to keep it simple, we will run a single simulation job. This job will contain a series of steps, each of which is a set of shell commands. For example; we will first check out the code, then install our ROS package dependencies, build our project and then run the simulation with rostest.
To further your GitHub Actions learning, I highly recommend the official documentation.
Write our workflow yml file
Let’s create an empty file for our GitHub Actions workflow under the project root at .github/workflows/sim.yml. Use the following stub as a starting point:
name: Run tests in simulation

# Run the tests when we push to the main branch
on:
  push:
    branches:
      - main

# Default to the burger variant of Turtlebot
env:
  TURTLEBOT3_MODEL: burger
Let’s add our simulation job, which runs in the ROS container image. We’ll also want to run in a bash shell and our catkin workspace directory by default:
jobs:
  simulation:
    # Run steps with the ROS Melodic container
    container: public.ecr.aws/docker/library/ros:melodic-robot
    runs-on: ubuntu-latest

    # Use bash and our catkin workspace folder
    defaults:
      run:
        shell: bash
        working-directory: catkin_ws/

    steps:
      # To be defined ...
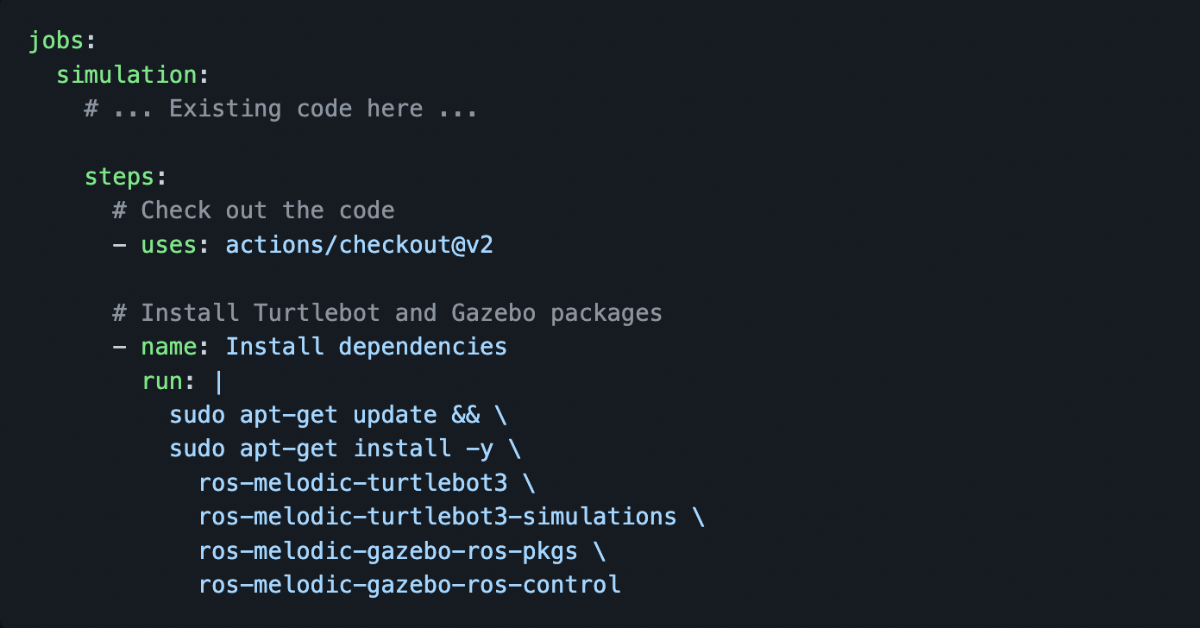
The first steps will check out the code and install the Turtlebot and Gazebo simulations:
jobs:
  simulation:
    # ... Existing code here ...

    steps:
      # Check out the code
      - uses: actions/checkout@v2

      # Install Turtlebot and Gazebo packages
      - name: Install dependencies
        run: |
          sudo apt-get update && \
          sudo apt-get install -y \
            ros-melodic-turtlebot3 \
            ros-melodic-turtlebot3-simulations \
            ros-melodic-gazebo-ros-pkgs \
            ros-melodic-gazebo-ros-control
Then build the workspace and run the simulation:
jobs:
  simulation:
    # ... Existing code here ...

    steps:
      # .... Other steps here ...

      # Build our workspace
      - name: Build workspace
        run: |
          source /opt/ros/melodic/setup.bash
          catkin_make

      # Run our ROS test!
      - name: Run tests
        run: |
          source devel/setup.bash &&
          rostest my_turtlebot_sim my_turtlebot_sim.test --text
You can see the full workflow file here.
Run the workflow
We’ve finished our workflow definition, we’re ready to commit and push our code to GitHub to see the action run (this step assumes you have setup a repository):
git add catkin_ws
git commit -m "My first ROS simulation in GitHub Actions"
git push
Open the Actions tab on your repository. For example; https://github.com/MechanicalRock/ros-github-actions-tutorial/actions. You should see a new workflow run for your commit. For example; “My first ROS simulation in GitHub Actions”.

Click on your workflow run to see more details. Click on the simulation node to see the details of that job.

From this view you can dig into each of the steps of the job. If all went well then your simulation succeeded, and you’ll be able to dig into the output of the “Run tests” step.

If you scroll down the logs, you’ll see the following key bits of output indicating that our robot travelled the expected distance:
[INFO] [1653028456.262115, 0.000000]: Travelled; 0.0 m
[DEBUG] [1653028456.292253, 0.000000]: connecting to 9fff04462213 57261
[DEBUG] [1653028456.292333, 0.000000]: connecting to 9fff04462213 57261
[INFO] [1653028457.382274, 2.729000]: Travelled; 0.2 m
[INFO] [1653028458.386740, 3.730000]: Travelled; 0.8 m
-------------------------------------------------------------
SUMMARY:
 * RESULT: SUCCESS
 * TESTS: 1
 * ERRORS: 0 []
 * FAILURES: 0 []
Success! Tests are passing.
If you have any issues with your project, please compare your project to the reference project in GitHub.
Conclusion
We’ve run our ROS simulation in the GitHub pipeline and were able to verify the output of the test. This gives us confidence to merge our code without it causing nasty side effects such as broken builds.
In the real world, you may want to integrate a simulation pipeline step as part of a larger pipeline that includes building, linting, unit testing and deployment. But hopefully, this tutorial gave you a starting point to work with.
If you need help with your pipelines, please feel free to get in touch with us at Mechanical Rock.
About the author
Hi! I’m Simon Bracegirdle, a software developer and cloud architect from Perth, Western Australia. I work as a Senior Consultant at Mechanical Rock, where I help clients to build cloud-native software and improve software practices.
To learn more about Formant, get a tailored demo with our team.